Categories
Just Photos

Bugs & Crawly Creatures in my Backyard

In addition to all the wonderful fruits and vegetables that fill my garden, I have also found that I have a backyard full of interesting crawly creatures. I’ve shown you the swarms of ladybugs, clumps of boxelder bugs, bumble bees and honey bees, moths and ants, and even a salamander on occasion. Well, not many weeks ago I found a new bug that I had never seen before. It had actually made it’s way into my bathroom and was climbing up the wall. It was just a tiny creature – not more than a quarter inch from top to bottom – but I tell you, it was rather intimidating.

Pseudoscorpion

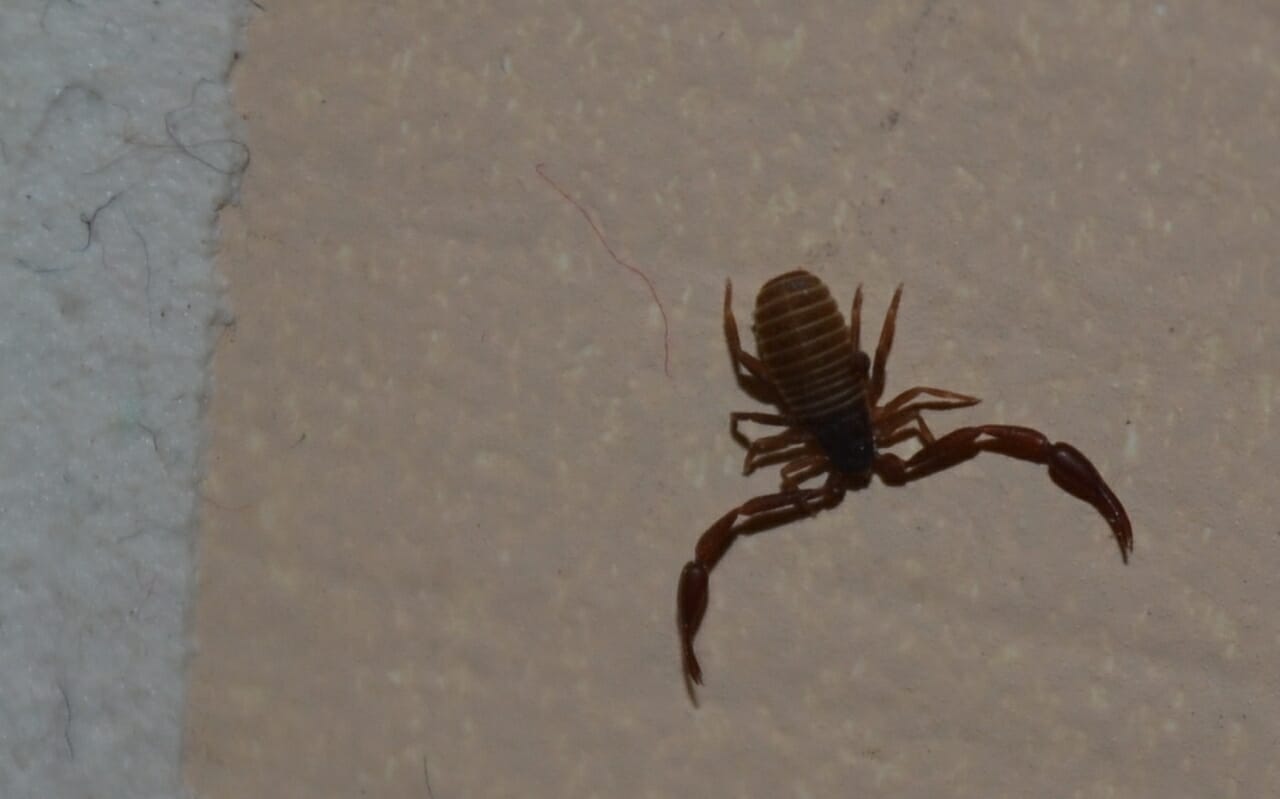
To get a good view of this fierce little fellow, click the picture to see a larger version. Remember, he’s less than a 1/4 inch! But he looks like a scorpion. In fact, after I did a little research, I found that he is actually a “pseudoscorpion” or a ‘fake scorpion’.He’s in the spider family and despite his fierce looks, is completely harmless to people and their gardens! He is actually good for your garden – he eats other harmful bugs. So if you see this guy or one of his relatives – just wish him well and let him go on his way!

And while I’m showcasing some of the “Bugs of my Garden” – here are a couple more!

Beetle

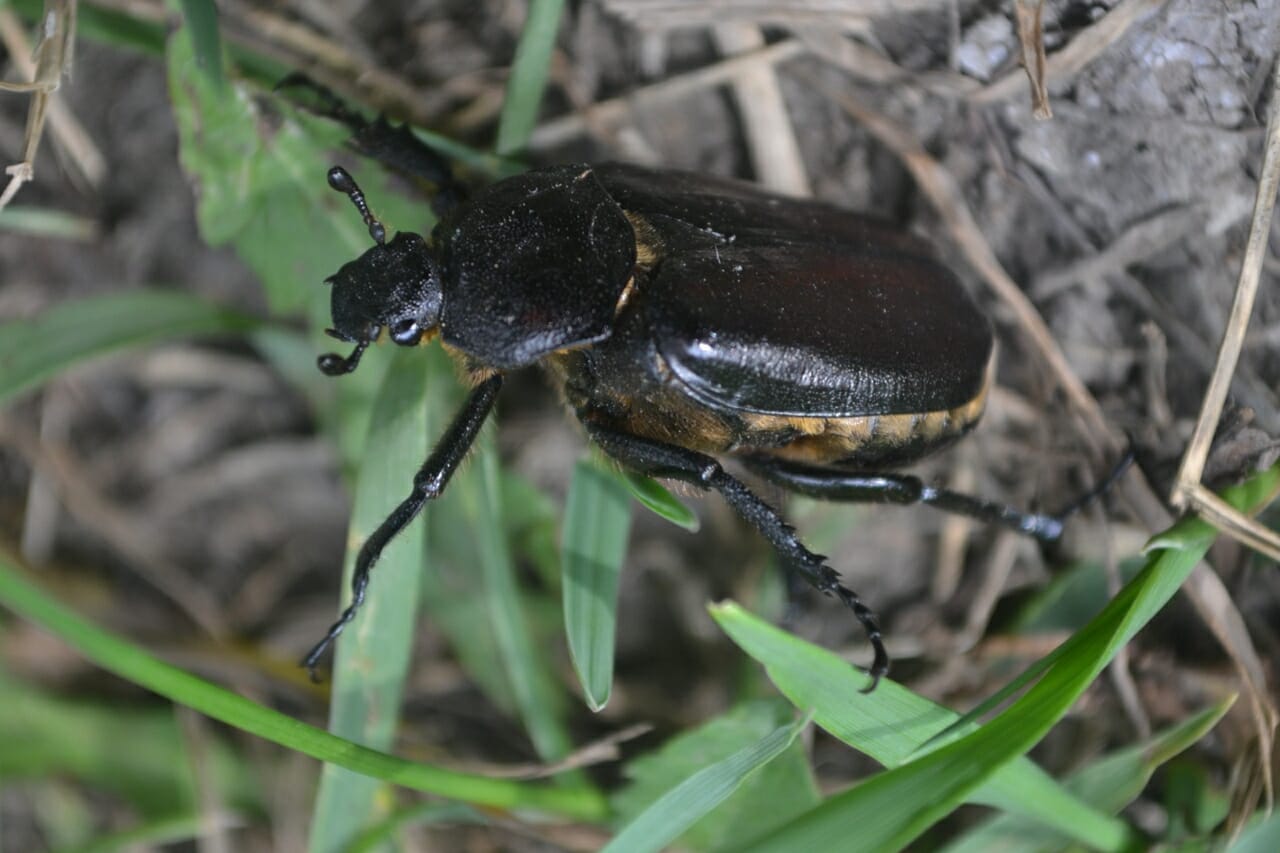
This giant beetle was crawling around my garden this summer. I think he’s one of the biggest I’ve seen here – he was about the size of a loonie.

snail

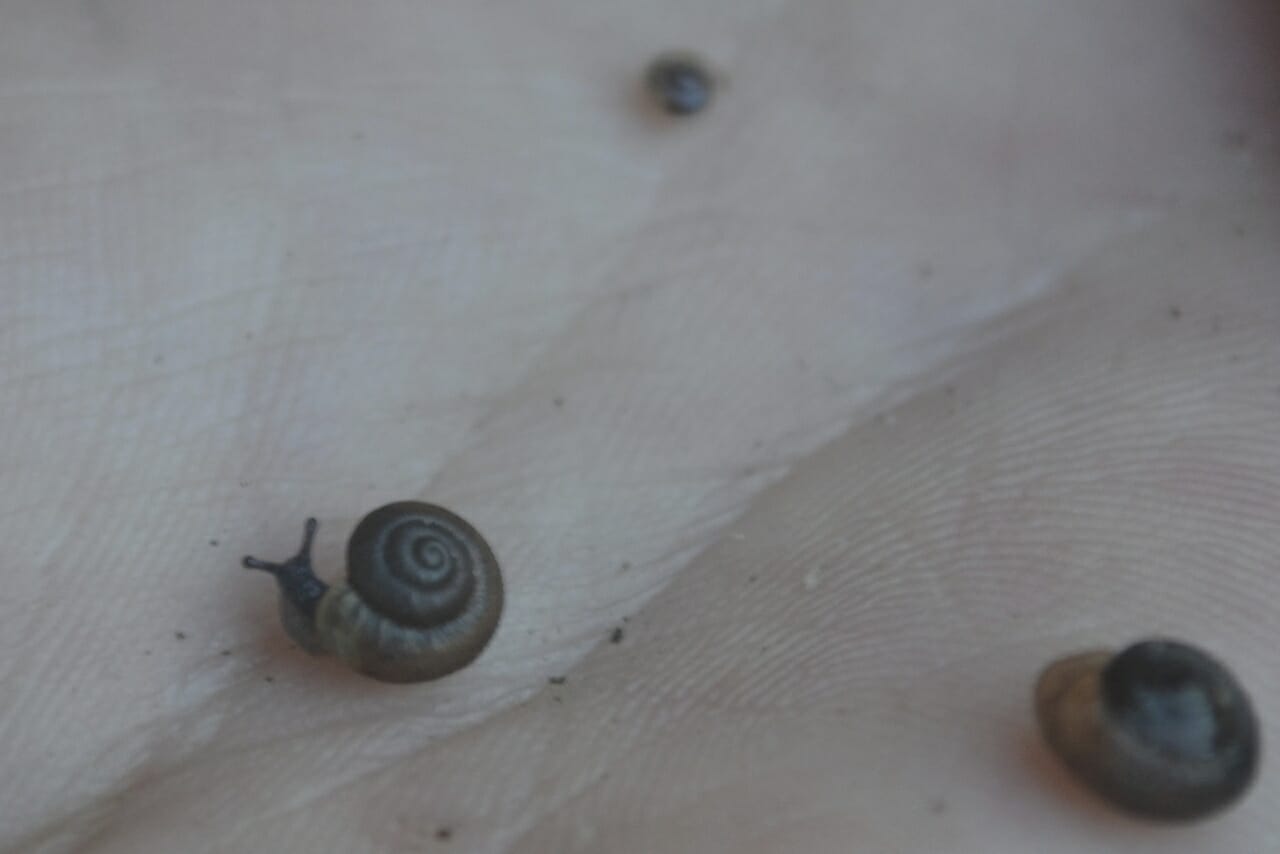
I wish you could see this tiny snail in real life. My 5 year old son picked him up (along with his two friends) and was watching them in his hand.  You can see how small they are by the lines in the palm of my hand. The one with his head out is about 3/8 of an inch.

slug

This snail without a shell (also known as a slug) was personally responsible for putting holes in my bell peppers. I never did like slugs much – but they are interesting to watch!

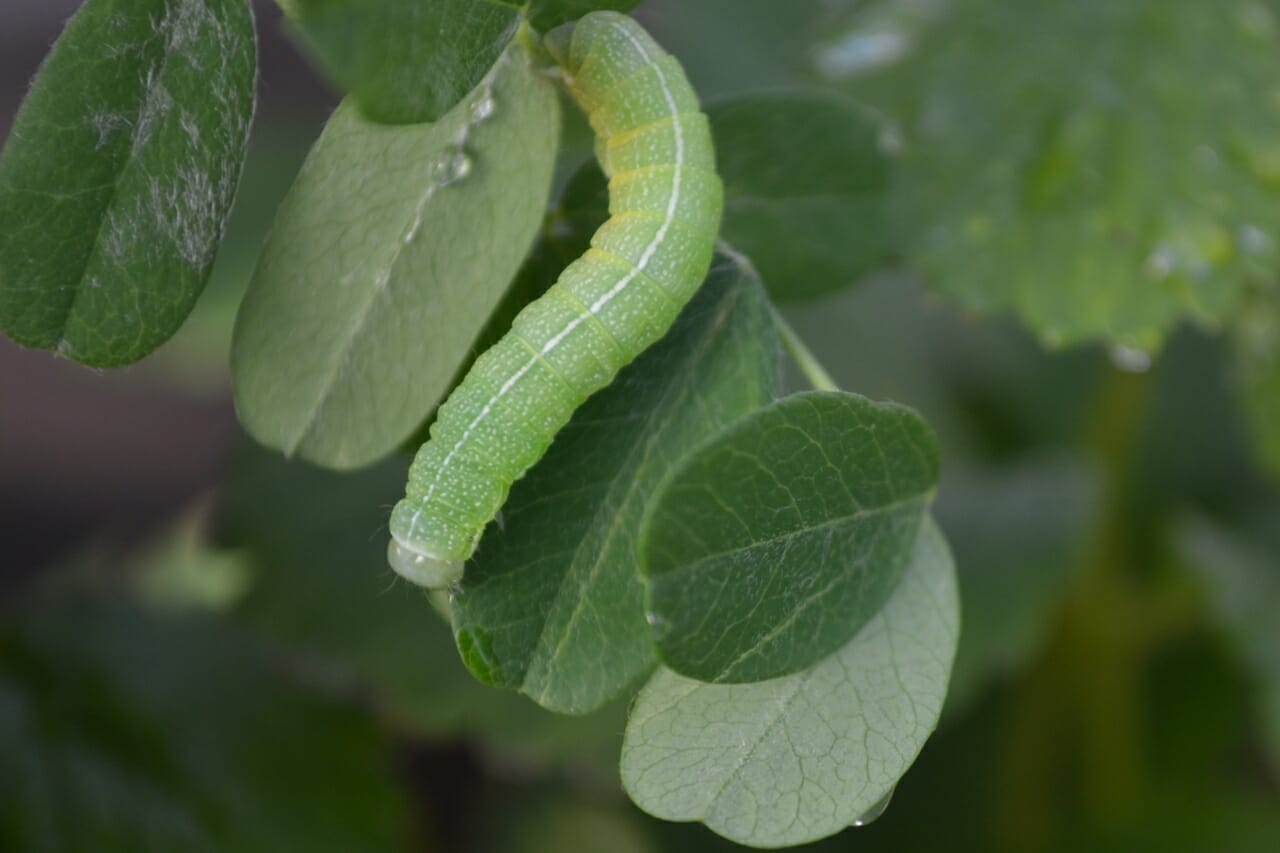
And finally to wrap it all up, here’s a cabbageworm I found. Again, interesting to watch, but it sure makes a mess of your cabbage and other green things!

cabbageworm

Categories
Growing Just Photos

Enjoying the “Fruits” of my Labour

For years I’ve been obsessed with growing fabulous, fresh fruit right here in Central Alberta. Not just saskatoons and strawberries – but grapes, plums, cherries, watermelons – yes, even kiwis and apricots. And I want to grow it all in my own backyard. Well, I can’t say I’ve got all those things checked off the list yet, but this year I’ve gotten closer than ever before.

This has been a fantastic season for growing fruit. After starting from scratch 5 years ago, my backyard is now producing all kinds of different delicious fruit. One of my personal favorites has been my Pembina Plums. We had about 5 gallons of these amazing plums this year. So juicy and sweet! I don’t think there is a fruit I enjoy more!

Pembina PlumsThen there are my “Chums” – my Cherry Plums. This is the first year that they have produced, and they are quite a nice little treat.

Manor ChumsThis variety is the “Manor Chum”. They are greenish-purple on the outside, and deep purple on the inside. Very tasty.

Manor Cherry PlumAnother highlight for me this year has been my raspberries. My Wyoming Black Raspberry grew like crazy – so much so that I think I’ll have to cut them right down to the ground this fall! They have almost overgrown the north side of my greenhouse! But they sure produce a lot of raspberries! And they are the perfect compliment to my “Fall Gold” Raspberries. These yellow raspberries are so mild! It’s all the flavor of a raspberry without the ‘raspy-ness’!

Fall Gold and Wyoming Black RaspberriesOf course, my haskaps really started to produce this year. I was amazed at how densely these little berries covered the branches of my little bushes. The kids loved picking these for a little snack. (And I’m excited for when my wife bakes up a batch of haskap berries muffins this winter!

Haskap BerriesMy grapes continue to ripen – I expect to harvest them in a couple of weeks. (My grape syrup from last year has just about run out.)

Valient GrapesMy muskmelons are getting to be a good size too. (Never heard of muskmelons? Think cantaloupe.) They got a late start, but I think they’ll be big enough for a tasty dessert or breakfast in the next days.

MuskmelonAnd finally, another fruit that I’ve highly enjoyed has been my cherries. I believe I had three varieties produce this year – hoping for another two to be mature by next year.

Sour CherriesSo it’s been a pretty great year for fruit. And hopefully next year will be even better! My kiwis have grown like never before (their vines have reached my garage roof), my apricots are coming along nicely, my blueberries are surviving (though not exactly thriving), and my hazelnut tree is slowly making progress. So we shall see what next year brings…

Categories
Projects

How to Build a Garden Trellis for Grapes and Kiwis

For years I’ve had great plans to build a garden trellis for my many varieties of grapes & kiwis – and finally this summer I took the plunge. I built a simple, but solid trellis for the vines I have growing along the south side of my garage. It’s probably a little bit over-kill, but it’s certainly able to hold the weight of all my grapes and kiwis (which is actually pretty significant – as I have two grape vines and two kiwis and all those vines, leaves, and fruit can get heavy!)

So if you’ve been looking to build a trellis in your own backyard, let me show you my design:

First of all – my materials list.

  • (3) 4 x 4 x 12′
  • (1) 4 x 4 x 8′ – (since my one section is under my garage window)
  • (17) 2 x 4 x 8′
  • (1) 2 x 4 x 12′

The first thing to do was to dig my post holes. I dug 6″ holes about 32″ deep – spaced 4′ apart – about 1′ from my garage wall.

The 12′ posts were too tall to fit beneath my garage eaves (even when planted 32″ deep), so I had to trim a few inches off the tops to fit just under my eaves. I had a window (as you can see in the picture below) that I didn’t want to cover up, so I planned to build that section at half height. Once the posts were in, I backfilled with gravel and tamped them in. You could use concrete if you like, but I think gravel holds it just as well (if it’s well tamped) and it allows the water to drain away from the post so it doesn’t rot.

Once the posts were all trimmed to the proper, level height, I simply attached the 12′ 2 x 4 to the top of the taller sections, and a 4′ section of 2 x 4 for the shorter one.

Garden Trellis PostsNext, I ripped the remaining 2x4s in half – giving me 2x2s. (The actual dimensions were 1.5″ by 1.5″)

Categories
Projects

A New Inexpensive Greenhouse within a Greenhouse Solution

Hoop-frame greenhouses are amazing! If you’ve been following my blog for long, you know I love my greenhouse. But as good as it is, I wanted to make it even better. I wanted to extended my growing season without adding a the cost of a heater. In 2009 I tried using milk jugs full of water to hold the heat and slowly release it through the cool of night. That worked pretty good. But what else might I try?

Well, here is what I did this spring: Now this probably isn’t a brand new idea. I’m sure someone has done it before, but its new for me. (And maybe for you too.) I decided to make a mini-greenhouse WITHIN my greenhouse.

It was fantastically easy (it took all of ten minutes to build it) – and completely inexpensive – I simply used materials that were leftover from other projects. Here, let me show you…

I just took six planks (1x6s – about 30 inches long that were leftover from my fence project last fall), and tucked the bottoms inside my planting bed frame. Then I screwed the tops together and attached a long 1×2 (8 ft long) that served as the peak of my greenhouse. It was absolutely simple. Then I just took and threw over some plastic like this…

Then I ran some tests to see just how much of a difference it would make at night. Remember this is with NO additional heat.

On the night of May 2, the overnight temperature got down to 3.1° celsius outside in my garden. The greenhouse was a little warmer, going down only to 4.8° celsius. But inside my mini-greenhouse within my greenhouse, the temperature stayed up at 7.4° celsius. That’s 4.3° warmer than outside with NO extra heat. That might not seem like a large number, but that makes a significant difference in your growing season. That little, inexpensive “greenhouse within a greenhouse” project, according to the weather almanac, could have just added 9 days to my growing season – for FREE!

And of course, if I had wanted to heat that little greenhouse, it would be much cheaper to heat that little space than to heat the whole greenhouse. So maybe I’m over-reacting, but I think this is way cool and will doing this project again next year – nine days earlier!

Categories
Commentary

Greenhouses: More Than Just Functional

Some of the most popular articles that I’ve written on this website have been about my inexpensive greenhouses. From my Giant 24’x48′ A-Frame to my hail-proof PVC hoop-style greenhouse, I’ve explored all kinds of options for how to keep my garden safe from the harsh Alberta climate. And while most of my ideas are functional solutions – I can’t say they are always beautiful solutions. Rough cut lumber covered by a plastic sheet does keep the tomatoes from freezing, but it may not enhance the overall look of your yard. And in many cases, that’s ok. A hoop-frame greenhouse out behind the barn on the farm fits in nicely, but it might look out of place in your beautifully landscaped city yard.

So if you’re looking for a more attractive way to extend your growing season, you may want to consider a Victorian greenhouse. These beautiful glass structures are not only functional, but they also add character to your garden and value to your home. When I was making the landscaping plan for my backyard, this is type of greenhouse that I designed for.

Search through several Grow Lights and other necessities for your greenhouse all at an affordable price!

Ideally, I’d like a fully heated, cedar-frame glass greenhouse – about 12′ x 30′. (My current hoop-frame is 12′ x 20′.) It would be great to start my own annuals out there (instead of in my basement like I currently do). And it would be nice to have my greenhouse as a key feature of my garden, rather than something to be hidden in the back corner.    Of course, I’ve been doing my landscaping in phases, (doing small projects as the budget allows) and so that type of greenhouse is still a few years away – but that’s the goal.

Until then I’ll be happy to keep on growing in my inexpensive hoop-style greenhouse and be just slightly envious of those of you who enjoy your beautiful glass greenhouses.

Are you one of the lucky people to have a Victorian greenhouse? I’d love to see your pictures! Feel free to attach them to your comments below!


Categories
Just Photos

Kiwis, Grapes, Blackberries, and More!

In my last post, I took a photo stroll around the yard. But at that time (May 20th), there were quite a few plants that still hadn’t grown enough to have much to show. But now after a long spring, I can show you all the other odd and unusual plants that have finally made an appearance.

But first, an update on my plums! Here is one of about half a dozen Pembina Plums.

Nice, huh? Am I ever excited for these guys! But back to the update… First of all, this is one of my grapes. Its a Marechael Foch Grape – my other one is a Valient. Both are doing nicely so far!

Then, there is my Issai Kiwi – I have two of them as well. I’ve tried growing them twice before. The first time a heavy frost just after planting took them out. The second time was an accidental death that I’d rather not get into!

I also have two Blackberry Vines in the works. This one was just planted this spring – so we’ll have to wait to see how they do over the winter.

I’ve also dug up some Black Raspberry plants from the farm and brought them to our new place. They will be planted along the fence, once the fence gets built! But for now they live in pots.

My cucumbers are doing nice. Just ate the first cucumber of the season yesterday.

And my tomates are happily growing in the greenhouse.

And that’s about it for now. Perhaps next time I’ll update you on whether or not my pole beans have overtaken the corn in which they have been planted! Until then…

Categories
Just Photos

Summer 2010 Recap

I must say, this has been probably the worst gardening year I’ve ever experienced. The weather has been very unfriendly to gardeners in Alberta. And yet, there is always a silver lining. All is not lost. Gardening in Alberta means making the best of your situation – whatever that may be. So here’s how I made the best of my garden this year.

One major project was to bring in a whole pile of mulch. (And I do mean that very literally.)

My father-in-law brought out a whole grain truck full of mulch that we applied liberally to our planting beds, in our greenhouse, and around our trees. It was a lot of shoveling, but I’m convinced that all that mulch will be worth it.

I also added a few plants to my landscape – plum trees, chum trees, cherry trees, kiwis, and grapes. Here’s some of the grapes.

Although many things in my garden didn’t do so well, the tomatoes prospered (even though they were a bit late.)

So that’s a quick update on my garden this summer. I’ve got a couple of other things brewing, but I’ll tell you about those later!

Categories
Growing Just Photos

Better Late Then Never

After getting started tremendously late (due to landscaping issues), my garden isn’t looking too bad – all things considered. My corn and beans are growing nice. Peas… not so much. After the birds pecked them to nothing they’ve been slow to recover. I might get a taste, but certainly not anything for the freezer. Carrots…well, let’s just say that their current average height is about one inch. Radishes grew tall, flowered, and had nothing to show for it at the bottom.

But potatoes…. Now they might do something. I’ll at least have a good stock of baby potatoes if nothing else.

Potato flowers

Now that my greenhouse is up, my tomatoes are coming along too. I’ve got some good golfball+ tomatoes right now and lots of flowers.

Tomato Flowers in my greenhouse

And of course, old reliable. The one that never fails. Rain or shine, sheet or hail. Nothing can stop… the weeds! But at least something is growing. And they’re kinda pretty too.

Pretty Weeds

Categories
Hints, Tips, and How Tos

When Can I Plant My Garden?

Well, it’s May and by now every gardener in Alberta is biting at the bit to get out there and plant their garden. Traditionally in these parts, gardens get planted on the May long weekend – this year landing on May 16th through 19th. Two years ago I planted my garden the first weekend in May and suffered no ill effects, but I don’t think I would dare do that every year. So what’s a gardener to do?

Find Your Frost Date

To start, find out what the ‘average last frost date’ in your area is. BE SPECIFIC. These can vary greatly from place to place. For example, Red Deer’s frost date is May 25. I live just 15 minutes south east of Red Deer, near Pine Lake. Pine Lake’s frost date is June 9th. That’s a whole 2 weeks difference!

And you can’t even guess based on north/south location. Hannah (south) & Edmonton (north) both have a frost date of May 10th! By the way, I think it is very unfair that Edmontonians (150 km north of me) should get to start their gardens a whole month before me! But that’s the way it is.

You can find the frost dates for your area at the Alberta Agriculture & Rural Development website.

Check the Forecast

Secondly, watch the long range forecasts for your area. I personally like the Environment Canada website, but they only forecast five days in advance. So for the long range forecast, I go to Accuweather Canada. They have a 15 day forecast that, of course, isn’t quite as accurate, but it gives you a good idea.

Guess, Hope, & Trust

All the averages and all the forecasts in the world will NOT guarantee that frosts or snow will not arrive after you’ve planted your garden. There comes a point when you just have to go for it.

For me, I’ve worked out a bit of a forumla: If it’s May, if the long range forecast has nothing colder than plus 2°, if it hasn’t pouring rain, and if I feel like it – then I plant my garden! Perhaps not the most scientific method, but thus far it’s worked for me.

This year things are shaping up to be ready to plant… [looking at accuweather forecast] Hmmmm. May 16th – the May long weekend. Go figure.

Categories
Compost, Mulch, Etc

How To Make A Garden From Scratch The Easy Way

Making a new garden plot is no easy task – no matter how you do it. But I may just have found the easiest and least work-intensive method of turning that patch of lawn into a beautiful garden plot.

In my early attempts to make new garden plots from scratch, I tried a variety of methods. I tried digging out the sod and then hauling in six inches of topsoil to replace it. Of course, that is a whole lot of work if done by hand, and renting machinery can be quite expensive. Then there’s the problem of what to do with the sods, and where to find quality topsoil.

Another method I’ve tried is to spray the grass with chemical, killing the grass, and then tilling the sod. But that means dealing with chemicals and finding a heavy duty rototiller which wouldn’t be cheap. Then once all that is done, you still have to go through an clear off all the bits and pieces of sod in order to have a workable garden.

So finally, I believe I have found a way to create a new garden space without machinery, without chemicals, and without any digging or tilling. Are you ready for this?