One of the most valuable assets in my garden is my greenhouse. It has allowed me to grow plants that I normally would not be able to grow, produce crops that the season is not usually long enough to produce, and protect my plants from frosts, hail, or other severe weather that normally would have destroyed my garden.
But I don’t have thousands of dollars to spend on a greenhouse. I just priced out an 8’x12’ greenhouse for $3,500. I would love to have a large, professional greenhouse, but that simply isn’t financially feasible for me. So, instead I’ve found a way to make a large greenhouse that is functional, easy to build, and inexpensive. This article will explain to you exactly how to build a 12’x32’ hoop-style greenhouse for under $400.
Required Materials List
Note: All wood should be green, treated wood to resist rot. (Or you can spend more money and buy a rot resistant type of lumber such as cedar.)
- (4) 2×6 – 16’
- (2) 2×6 – 12’
- (14) 2×4 – 12’
- (19) ¾” x 20’white pvc pipe
- (9) 10mm x 10’ rebar
- (1) 20’x50’ roll of 6mm plastic
- (1) Bundle of 50 4’ wood lathe (or optional staples)
- Zip ties
- Nails or screws
- Metal banding
- Door hinges and handles
Step 1 – Laying Out the Frame
Using the 2x6s, lay out and put together your 12’x32’ frame. (You can join the two 16’ pieces with a 2’ piece of 2×4.)
Ensure that the frame is square by measuring diagonally across it. You can temporarily keep the frame in place by pounding a 30” piece of rebar in each corner. (You can pull these out to use them in the next step.)
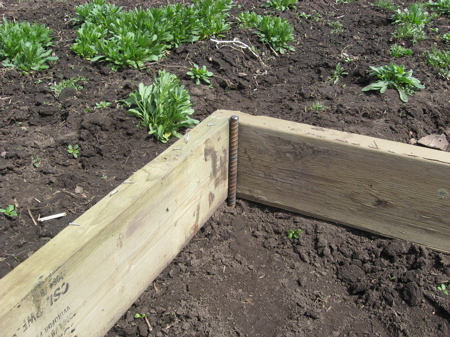
Step 2 – Adding the Hoops
Cut each 10’ piece of rebar into four 30” pieces of rebar. This will give you thirty-four pieces. Pound the rebar into the ground about 15” deep on the outside of your frame at two foot intervals. This will leave 15” sticking up out of the ground.
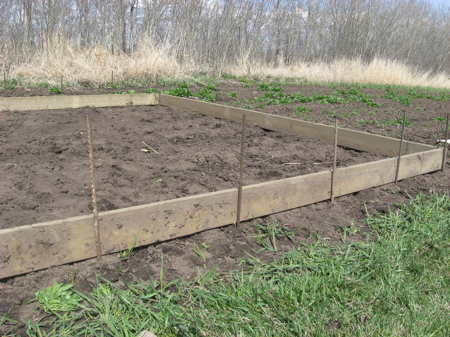
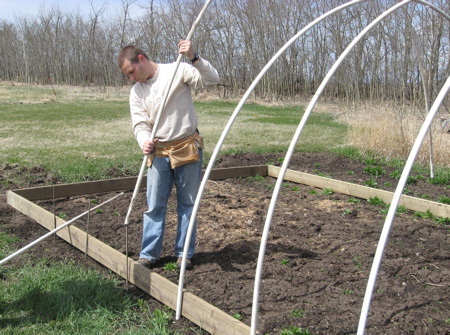
Now slide both ends of your pvc pipe over the rebar to make a hoop across the width of your greenhouse.
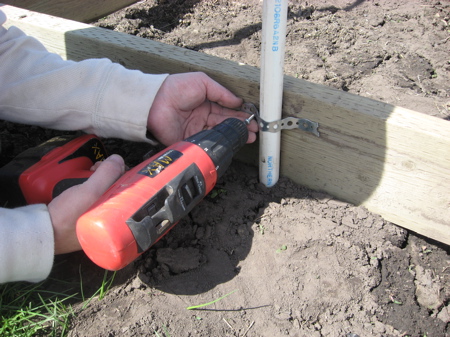
Attach the pvc pipe to the 2x6s by screwing short pieces of metal banding around the pipe.
Step 3 – Building the Ends
Cut the following pieces out of your 12’ 2x4s:
- (2) 11’8¾”
- (4) 1’6″
- (4) 4’7″
- (4) 5’7″
- (8) 1’11¼”
- (2) 4’¼”
For each end, assemble the wall according to the following diagram.
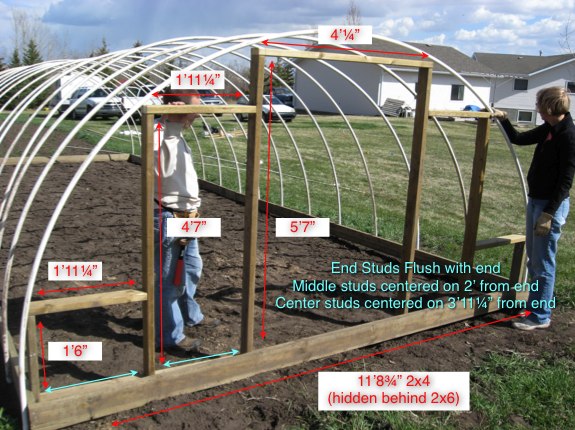
Place this wall within the 2×6 frame and nail/screw in place.
Cut (4) 28” 2×4 pieces. Cut one end at a 45º angle. Use these pieces to brace the wall.
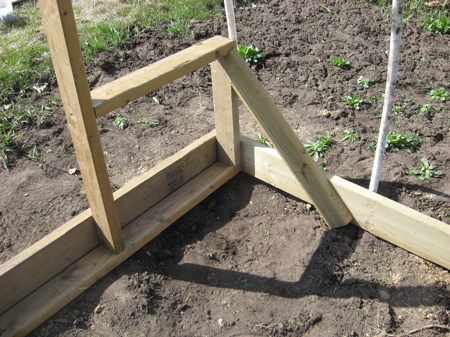
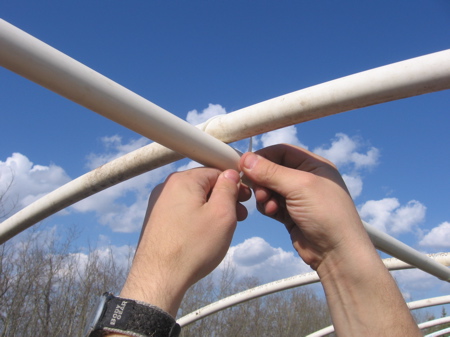
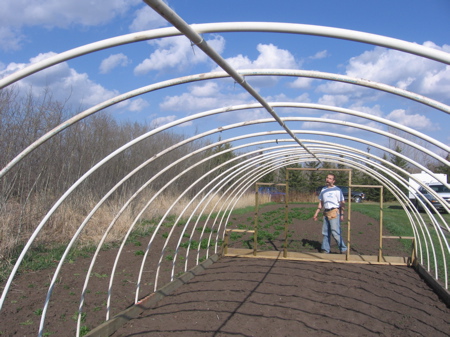
Once all of the hoops and the two ends are in place, connect two pvc pipes together and cut them to measure 32′ long. This will be the rib that will go along the top of your hoops. You can attach this rib with plastic zip ties.
Step 4 – Covering the Greenhouse with Plastic
If you are going to use wood lathe, cut 32 pieces of 20” lathe. These will secure the plastic to the sides of the 2×6 frame in between each hoop. Or optionally, you can use staples, though they may have a tendency to pull through the plastic.
Drape the plastic over the length of the greenhouse. Be sure to have enough overlap at the ends to cover the end walls. Pull the plastic snug and attach to the 2x6s at one end using the wood lathe or staples. Go to the other end, pull snug, and attach in a similar manner. Do this at the center, and then along the rest of the length of the greenhouse.
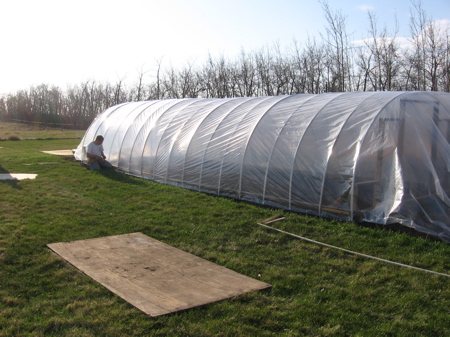
Note: If you can do this in warm weather, there will be less sagging later. Make it as snug as you can without causing damage to the plastic.
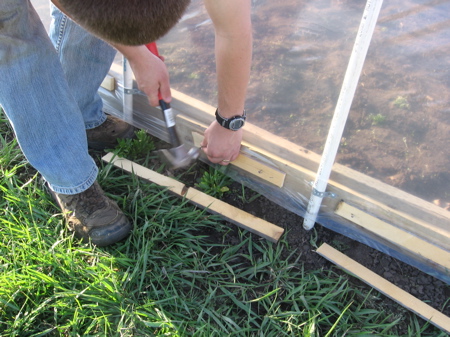
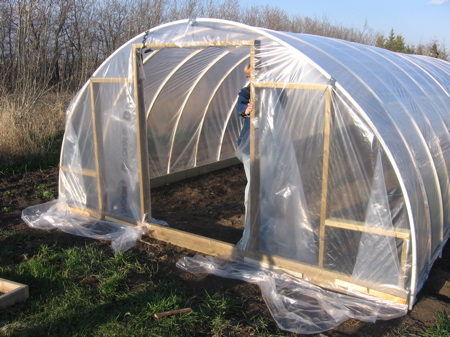
To attach the plastic to the ends, pull the plastic straight down, and attach with lathe. Then pull the plastic out to the sides. This will give you extra plastic along the outside edge. Fold the plastic back towards the center and attach. For the end with the door, cut out the plastic leaving a few inches of over hang to wrap inside and attach.
Step 5 – Adding the Door
Before you cut your pieces, check the actual measurements for the space you have. Your wall may sit a little different than mine. It’s always better to go a little small or your door may not fit. But if the measurements are the same, cut the following pieces out of your 12’ 2x4s:
- (2) 4’11”
- (2) 3’9″
Nail these together to make your door frame. Lay a 2×4 diagonally across the frame and nail in place. Trim off anything that hangs over the frame of the door. This will be on the inside of your door. Too much wood hanging over will jam your door. Attach the hinges to the door frame.
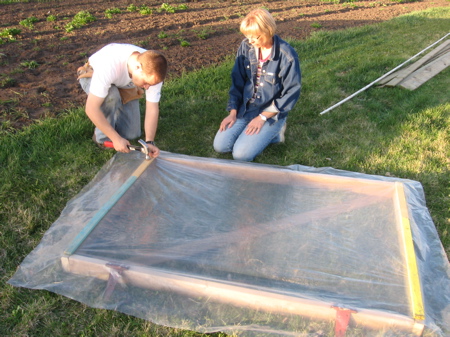
Cover the outside of the door with remaining plastic or you can use plywood if you would rather. You can attach the plastic with the wood lathe or staples. There should be about 4” of overhang of plastic on all sides.
Attach the door handles to the door. Mount the door to the frame.
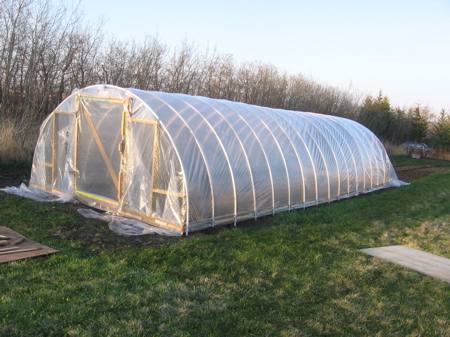
And there you go! You can have a beautiful 12’x32’ hoop-style greenhouse that can be built in a weekend and all for less than $400.
——
Update: July 11th, 2008
To see just how well this greenhouse works, see my July Greenhouse Update.
Update August 5, 2009
For an new and improved version, see An Inexpensive, Hail Proof, PVC Pipe Greenhouse.
Update November 29, 2010
Improved design. Changed material list from half inch PVC to three-quarter inch PVC.
456 replies on “How to Build an Inexpensive Hoop-Style Greenhouse”
Hi Dave,
Thanks again for your reply. I was going to experiment with joining two lengths together to get a good height maybe try a 20ft and a 10ft.
I not too sure weather the join would cause a problem as far as weekness is concerned. I hope that the bend in the pipe would not cause the join to split. Thanks again !! P.S I live in Barbados so snow is not an issue , just the heat and the odd Hurricane !!
hi there!
I want to know if this structure is weather resistant. What happen when the rain is severe? When the wind is severe? It can be built larger? say 25’x105’…. do you think it would be a good idea for a commercial initiative? thanks a lot every one, all opinions will be considered? 🙂
If the greenhouse is properly anchored, wind and rain should be no problem in all but the most severe weather. You could build it larger provided that A). You have sufficient ventilation and B). The arches are sufficiently supported. You may need a center support system for spans over 12′. I’m not sure I would go this way for a commercial venture – I would likely choose a steel frame.
Hi Dave,
Just wanted to let you know that I used your plans to build a greenhouse on Mother’s day this year. I’m located in Alberta, near Edmonton and we’ve had some snow and fairly strong winds since I put it up and it is holding up fine. Building the greenhouse only took me about 6 hours – my cost was a bit higher (around $500) as the store I went to didn’t have everything so I substituted some more expensive material and bought twice the amount of poly as was needed.
Your plans were great, before finding them I was going to build a small wood-frame green-house but this one is much bigger and better.
Thanks,
Don
Hi Dave,
I live north of Toronto , and the winters can get pretty cold, around -30 C.
We have potted fig trees that we keep outside during the spring/summer months but by October, we bring them inside and store in our basement until the following Spring.
With this type of greenhouse, would it be possible to keep them outside in the greenhouse growing and producing fruit all year long?
Thanks Steve
Hi Steve! This type of greenhouse would be quite expensive to heat all year round. If you did want to heat it, you would want to two layers of poly with a layer of blown air between them. Even this at -30 would lose a lot of heat! If I were in your situation, I think I would either A.) Build a sun room onto my house, or B.) Keep doing what you’re doing!
Dave
wow! this is amazing! also living in northern alberta with lots of snow & cold, so i’ll definatley upgrade to the 10mm poly!! cant wait to fabricate this design!!!Honestly thank you so much! i was literally minutes away from ordering a much smaller greenhouse for $1550. from sears canada. Your blog has also bin incredibly inspirational for us:) take care & keep blogging!! i will post pics as soon as its complete! ~Thanx again~
what type of heating would you recommend for attempting some crop’s throughout the winter months, if that is even possible!??
If money were no object and I wanted to heat this type of a greenhouse, I would use in-floor hot water heating. That would keep the soil and the air temperature warm enough throughout much of the winter, but in -40 degree weather, I’m not sure this structure could keep the heat coming in as fast as it goes out. But then again, I’ve never tried, so who knows….
# 60 steve.
Hi Steve,
A friend of mine has fig trees in a greenhouse, he started with a 20’x48′ x9’tall house but the trees grew too tall. Now he has a 30x48x18′ tall and the trees still grow almost to the roof!
He was spending around $300 a month on gas to heat the greenhouse to 5 degrees C through the winter. Now he uses a used oil furnace so the oil is free but he paid 10,000 for the furnace.
The trees still go dormant in the winter but they grow like weeds in the spring.
If you do put up a greenhouse you will eventually need somthing very tall, which will be even less efficient and more unstable in the wind. So you might be better off to build from wood and if possible face the building east west so you can insulate the 3 sides and leave the south side covered with double poly or lexan.
Good luck.
We are going out today to buy the materials and build this greenhouse over my existing garden..Weve had nothing but rain and more rain to come..if my garden doesnt get covered it I’d might as well forget about everything in it… thanks for this great idea that is cost effective.
hi this is great, i too have a poly greenhouse athough i used conduit. i wanted a bigger one and was clueless how to go about it. this is perfect. for my existing greenhouse i have 4ft high framed walls with conduit completing the roof. i ended up with a 8 ft greenhouse that is 6 ft wide, shelves run the length on both sides wide enough to accomodate flats of plants underneath i used closet rod hangers to hold more conduit to accomodate my baskets, while the floor on both sides holds all my planters. i used 1×3 lumber to use at the peak to sandwich the condiut and it also holds my heat lamp and gro lights well. i also used more 1×3 to hold down thw plastic over the wood framing.i used a double layer of 6 mil poly as well. the only venting is the door. i can hardly wait to do a larger green house next year. thanks!!!
Hi Dave:
Thanks for taking the time to document your nice procedure. I leave in Austin and here we have an issue with deer. I’m thinking about using your design to make a protected vegetable garden. However, due to hot temp, I’m thinking about using chicken wire instead of plastic. Do you think the PVC is strong enough to hold the weight of chicken wire? .. a 48″ X 30′ for each overlapping section of the structure would weigh approximately 10 lbs.
Thanks in advance for sharing your thoughts on this,
Mosen
Hi Mosen! I think you’ve got a great idea using that chicken wire – I’m sure the weight would not be an issue. I’d love to get some pictures from you when it’s done!
Thanks so much for your version of the hoop green house. Just wanted to let Mosen know that I built a similar design but with chicken wire to use for my chickens so they could free range without being bothered by my dogs. The pvc has no problem supporting the weight of the chicken wire. I tie wrapped the wire every few inches along the pvc and it stiffened the structure also. I stapled the bottom of the wire to my wood frame that made my bottom supports.
What kind of plastic should be used?
Like stuff I can get at rona, Or the building box?
Scroll through the other comments on this page – lots of ideas for plastic!
Thank-you so much for sharing your greenhouse design. Your instructions are so clear and intelligible that I think I can actually build one. I have looked at ready made large greenhouses and they’re all too expensive for my budget so I’m elated to find this information. It is also very refreshing to see an idea like this shared without asking for a fee but if you do have things for sale related to gardening I would be interested in hearing about them and/or seeing them. Thank-you again, Take care, Lee.
would using cross tees not make for a sturdier construction? Also hauling 20 ft. lengths of pipe can be a challenge.
My interest is primarily for a poultry run that will be covered with stucco or other strong wire. Maybe the base perimator will be stucco and the top will be a lighter material. I never thought of using rebar to secure the base.
Actually, the first hoopframe greenhouse I built I used cross tees, and I had two pipes break right where they joined the tees. I haven’t had a 20ft break yet. (But transportation is a challenge…)
I use this design for my pastured poultry. Of course I don’t need an 8 ft. wall for an 18″ chicken so I cut the poly pipe into 10 ft. lengths. This gives me a 7 ft. wide by 3 1/2 ft. hi structure. The chickens need shade and shelter from rain so I put about a 4 ft. strip of tarping along the top of the hoops full length and tie it down to the rebar and secure it to the end hoops. Then I run around the two sides and one end with poly secruity fencing or plastic chicken wire, tucking and tying at the corners, no need to cut it. A fifty ft. roll of fencing gives you about a 20 ft. run. Since the fencing is only 4 ft. hi it would not go right to the rop of the hoops and would leave a gap along the top but that is covered with the tarp roof. I also throw a tarp over one end for their” house” for sleeping at night and to get into out of the wind. Works great for growing out chicks to point of lay. Just think – no cleaning out chicken houses, just move it. It leaves a lovely fertilized spot where the grass quickly pops up. For chickens one does not need the wood around the bottom, just let the fencing curl into the pen at the bottom about 4 inches then there is no sneaking out even if your pasture is not level. I built a square panel that fits against the open end of the run which I just swing aside when I want to feed and water. No need for me to go in there. The “gate panel” is a piece of concrete reinforcing wire (6″ x 6″ steel mesh) covered with fencing. The steel wire acts as a frame to hold the fencing up. I just bungie it to the end of the run. I wish I could send pictures of my happy chickens in their chicken patio. A picture is worth a thousand words.
Thanks for your great ideas and plans. I plan on creating this greenhouse very soon. However I was wondering how to vent this greenhouse? It says to put vents at the rear & sides but doesn’t explain how? Also, I want to buy the 12 mil woven poly, is there anyone in Alberta that sells it? Did you purchase your pvc from a lumberyard? I’m very excited about this project, & like many other Albertans wish to increase our growing season. I hope to hear from you soon. Dianne.
Right now for my ventilation, I keep both doors open all summer, just closing them over night on frosty nights. This seems to be plenty of ventilation for that size of greenhouse. If you went longer you may need to add side ventilation. As far as the 12 mil woven poly – I don’t know of any in Alberta. Northern Greenhouse in Manitoba is the only place I know about that does the woven poly. My pvc pipes came from Home Depot, but I’m sure any lumber yard should carry it.
Nice article and explanation. I built a hoop house (cold frame) a few months ago. I purchased mine from FarmTek.com. I got the 10W by 20L. You can see their sizes at: http://www.farmtek.com/farm/supplies/prod1;ft1_coldframes_hightunnels;pg105158f.html
The frame was very sturdy and I picked up greenhouse film from them too. I’ve enjoyed this year’s tomatoes so much, that I’m thinking of getting a bigger structure. They call them high tunnels. Look at: http://www.farmtek.com/farm/supplies/cat1a;ft1_coldframes_hightunnels.html. They also have manuals you can download too, so if you are building one, you can get good ideas. Peace.
Dave, I have a question, we want to build a greenhouse a little wider that the one in this plan, is it possible to take say 2 16″ pvc pieces connect them with a connector and pvc cement, then bend, or would the joint screw up the bend? I am just thinking smaller sized pvc pieces would be easier to deal with. Possible? thanks
The 6mil plastic which I used for my greenhouse did not last one season because I used steel wires for connecting the PVC pipes which burnt the plastic.
This season I am planning to cover the plastic with white tarp which I got from Home depot for $26 for 19′ X 20′. The tarp looks very tough for tearing. Any comments appreciated.
Hi Dave,
Love your design. I am in Florida and plan on building my greenhouse in a few weeks. Do you think it would take away from the sturdiness, if i placed the rebars inside of the frame verses outside the way you have it. Thanks
Actually, I would recommend putting the rebar and pvc on the inside of the frame. That’s one modification that I’ve made to the design – you can see my latest design here – https://www.albertahomegardening.com/an-inexpensive-hail-proof-pvc-pipe-greenhouse/
like your blog as this is something I have had an interest in for some time. One question to you guys, especially for those who leave their plastic on over winter, the problem I forsee in Ireland is the wind rather than the snow! would the pvc plastic pipe be strong enough even with rebar in it to withstand some of the winds we have on the western seaboard of Ireland? If not how did you get around the problem?
thanks
Paul, I can’t speak to your specific winds, but we do often get some strong winds here. In my experience, the strength of the PVC in the wind isn’t a problem – it’s more of a concern of the strength of the plastic (or perhaps how well the plastic is attached.) I’ve heard of wind lifting the entire structure if not properly anchored, but the PVC itself has had no issues that I know of.
Just in time for spring in the Ozarks! Freshe food!!!!
That looks great we are looking for just your kind of set up but at a lower price than the commercial fat cats are offering.
We have professional market gardener friends coming to stay this summer so the pressure is really on. Wish us luck and I will let you know how we get on. Many thanks for being so open and generous with your knowledge.
Thanks for the wonderful idea. I finally found what I’been looking for. It seems really unexpencive and funcional. Keep doing watever you’re doing, helping another people like myself. Thanks again
a few questions and also a reply to post 42/43?
the pvc pipe should flex in winds and absorb any sudden wind loads
shifts/shocks. im more concerned about the amount of heavy snow
we get here. and the odd mild days then rapid cold snaps where we get
temperatures that dip down to -38’c. and high winds.
id like to find a way to heat the green house to make it fully functional
through the entire winter months here in ontario,canada.
my idea was to build a small wood frame structure with single pane
glass windows (wood frame around the windows already) and build
a small structure at one end, and use an old wood stove for heating.
a few fans to blow the heat around. condensation might not be a bad thing, a little dampness and humidity might be a good thing.
any ideas on this?
coehill.dave @ gmail.com
you have made it very simple and user friendly. I didn’t notice anywhere what the thickness of the pvc pipe is. I assume it is the thicker walled, schedule 40 material. Please confirm. Thank you.
You can use either, but I find the 20 is more flexible and less likely to break as it gets brittle with time.
When I found your plans for an inexpensive greenhouse I knew it was for me. I read every comment and researched all the sources you recommended for covering etc. I finally decided on the 12X32 version with some revisions.
Since I am 6’4 I needed more height so I added 2 ft to the hoops. I also decided on the plywood ends and I added some extra internal bracing there. One other major change–I bought elec conduit clamps to fasten the hoops to the base. Much, much easier to use than the strapping material. I chose plastic covering over the mesh due to high cost differences and no apparent guarantee that the mesh would last longer–not counting hailstorms. I live in N. central Texas and hail is a possibility. I also spent closer to $650 rather than the $400 you originally estimated but it is still a bargain. Now to the planting and growing.
big jim
I think your design looks great. I’ve been drooling over greenhouse catalogs and thinking it would be years before I could afford to get one. Now I’m thinking that maybe my husband and I can actually build one a lot like yours. My only question is, I live in Payson, Utah where we get microbursts just about every spring and sometimes more often. The winds can get up to 60 to 80 miles an hour, but usually only last a few minutes. Trees are usually uprooted all over the place and we have to replace roof shingles constantly (it seems like). Anyway, if you have any ideas about handling those nasty little winds I would be very appreciative. I don’t want to see my future greenhouse sailing across the field the next wind storm we get. Thanks so much!
Sincerely,
8daisy8
This greenhouse should be fine even in the wind as long as you anchor it. Pound some long wooden stakes along the inside edges and fasten the stakes to the frame. This will keep the wind from picking up the whole structure. And as long as your poly is tight and attached securely, the wind won’t be able to rip that away either.
WOW I’m inspired. Just recently divorced and don’t have much money. I’ve got a little bitty purchased greenhouse that I spent far more on and is a pain to put up have to be a rocket scientist have have multiple helpers to assemble.
I also liked the ideas about utilizing this with small modifications for inexpensive poultry housing as well. When you start looking at $12K greenhouses it becomes cost prohibitive and offsets any potential savings from growing your own food. Costs of barns and buildings for small livestock also becomes prohibitive.
Thank you Dave.
Thank you for this great comprehensive post, just what we need!
Thank you thank you thank you!!! I needed this and to build a greenhouse and I was getting pretty frustrated with the cost of the metal hoops and even finding them without buying a whole kit!!!! My plants thank you and my family thanks you!!!
Dave,
Great idea and excellent instructions! I built a shorter, 16 foot version due to space limitations and my gardening wife is really pleased with the results.
We live on southern Vancouver Island and woke one morning in late winter to see wet snow falling. The small amount that had accumulated (less than 1/2 inch) was enough to deform the supports, so after snow removal a supporting beam was installed.
Cheers, Dave.
Hi Dave,
I have just started my polytunnel and I was wondering if black pipe would be a problem, I am in Ireland and the temperature rarely goes above 72c.
Thanks Joe
We arew about to make a mini green house using this method, Thanks for a great blog its helped heaps 🙂
We offer a greenhouse of 20′ x 20′ made out of galvanized steel and covered with polyethylene at price of 1,000$ at our distributor (CA).
Other accessories such as: door, benches, anti-insect curtains are available
E-mail: [email protected] or [email protected]
One night digging around the net we found your plans for this awesome greenhouse.It was easy enough that most anybody could tackle it so we bought the materials and got busy.14 hours(give or take a few beer breaks) and it was done.I love showing it off to my friends who are amazed at the cost and ease of the assembly.We live in northern B.C. and we are confident it will serve us well. We modified and customized a bit and we love it. Thank you for sharing your idea with us all!!
Katherine in Telkwa,B.C.
Hello, I have a question. Where did you get pvc pipes? We just started building our green house using your model and it is over $400. How did you managed under $400? We still cannot find pipes. What is your advice?
Check Home Depot or UFA for 20′ PVC pipes. Keep in mind that this was two years ago… Prices may have gone up since then, but you should still be able to be around the $400 mark…
Has any one heated this type of structure? If so what is the size of your greenhouse and how did you heat it? We would like to use this one for growing on seedlings and it can get down to -10 C some nights.
And another question…has anyone made this GH mobile? Ie put it on skids or make it able to drag to other spots? any details would be greatly appreciated!
I just wanted to tell you how excited we are about getting our greenhouse up! We have been pricing out greenhouses, saving the old windows from the reno’s trying to firgure out how to built our greenhouse!Well then i found your site and was so excited to show it off We are making our list and checking it twice to make sure we got all the materials written down! We love your greenhouse and thank you so much for making it so building friendly !!! The step by step is awesome thank you again and happy gardening!
I also had problems finding 20′ lengths of PVC. I live in the Edmonton Area. What I ended up doing is going to Totem and buying 10′ sections of PVC pipe. They are grey in color, but the pipes could be joined together as one end was slighly wider on each piece.
We built a pvc greenhouse a few years ago and love it…kind of a cape cod style and will add the hoophouse over the veggie garden next weekend as the growing season here in southeast massachusetts starts as rainy/cold season the past few years, can’t wait to use the plans on this blog and get the crops going earlier and keep them going later. We had no issues with snow last year, the pvc is alot stronger than we thought it would be…
Also,
Snow is probably, the worst enemy of PVC hoophouses! If you live in a heavy snowfall region, perhaps, using cattle panels , instead, would be better material. Something like this,
http://www.ehow.com/how_6169734_build-livestock_cattle-panel-hoop-house.html
hi,
I came across your site while surfing and i am glad i did.
Even though i live in the tropics (we dont get snow) I want to build one mostly for tomatoes; lettuce watermelon; peppers, cabbage and spinach.
we have a lot of bugs to fight with and I usually have to spend a lot of time looking for the caterpillars and and other bugs. Quite a few of my plants have been destroy by these bugs. I your idea reinforce my design that i have and will make it more stronger. When I build it (it is not gonna be as massive as yours) i will send you some pics. Thanks for posting!
Julietta
from Barbados
What would be the best way to cut the rebar? I’ve heard circular saw with a diamond blade and I’ve heard bolt cutters…
David – I used a metal chopsaw. (The grinding disc goes through in seconds.)
My husband built a small one. We started with the hoop, but then gave up and built a simple wood frame on top of our raised bed (so its a “rectangle house” now) and covered it with plastic and tuck tape and a few nails. Cutting the plastic with a razor blade. Leaving one side with a door that you lift (secured with wood latch). This is obviously not a fantastic design as rain water accumulates and adds weight to the top, we’ve propped a garden rake in the middle almost like a tent pole, this works ok! We need to peak the middle in some other appropriate manner, however this still works and is very easy. Crops are growing well so far 🙂
i have one acre in canada(bc) if i want to build greenhouse in 1 acre how much it will cost me????(i think i have to build 6 or 7 in one acre)
i want to grow vegetables in greenhouse and sell them to local markets
if u know anything about it plz help me
thank you very much
We are looking at putting this up in a 20′ x 50′ to over winter our pastured poultry with deep bedding. Any thoughts on building one this big? Our budget is small as we’re just beginning. Our hens have been in Salatin style pasture shelters all year but by November 1 we need to bring them in for winter protection.
I built my frame today but we had to make it 10×32 due to size limitations of this part of our yard. I was wondering if I would still use the 20 foot PVC pipes…I thought that it would just make the GH a little taller..do you see any other problems with this modification?
Thanks!!!
Vicki, I see no problem. As long as your pvc pipes can handle the strain of bending that far, it should work great! Be sure to send us a picture!
Mate,
Thats a great tutorial.
I cant believe you detailed the whole thing.
BIG THANKS
Aanee xxxx
Use black zip ties only as clear, natural will disintegrate within one season due to sunlight. A small investment in better materials will save lots of time.